
March 18, 2026
.jpg)
Shahar Azulay • Mar 18, 2026
Find out how to easily set up Network Policies that control how traffic flows within your cluster, and how the cluster interfaces with external endpoints.
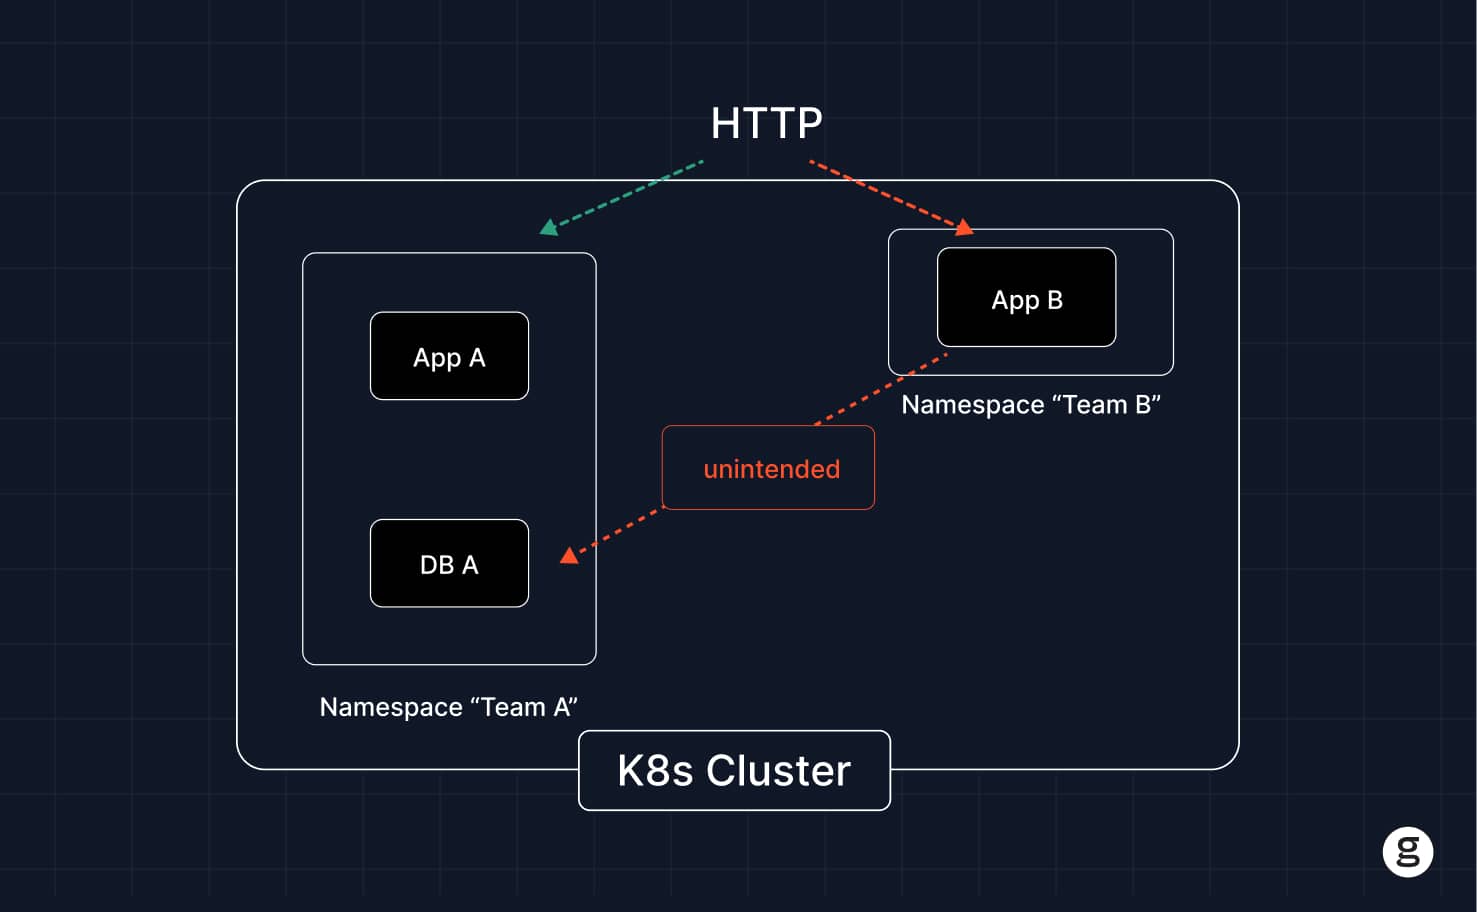
Imagine you’re out in public, trying to have a conversation with a friend. At the same time, several random strangers are also shouting things at you. Not only can you not hear what your friend is trying to say, but you may also struggle to express yourself because your words are drowned out by all of the noise from other people.
This is a little like what happens in a Kubernetes cluster that lacks Network Policies. When you don’t configure a Kubernetes Network Policy for each of your pods, you may end up with lots of random network traffic flowing between pods and other endpoints. In a best case, this could degrade performance by flooding the network with unnecessary traffic. In a worse case, it may lead to security issues by making it easier for attackers who compromise one pod to spread their breach to others using the network.
The good news, though, is that – as this article explains – it’s easy enough to set up Network Policies that control how traffic flows within your cluster, as well as how the cluster interfaces with external endpoints.
In Kubernetes, a Network Policy is a type of rule that determines how pods communicate over the network. Network Policies can control traffic flows between pods and other resources within a cluster. They can also manage traffic between the pods inside a cluster and external endpoints.
Let most other configuration resources in Kubernetes, Network Policies are defined using YAML code. We’ll take a look at some examples in a bit.
It’s important to note that you don’t strictly need to create a Network Policy for each pod in Kubernetes. However, without a Network Policy, Kubernetes defaults to allowing all traffic to flow into and out of a pod – which could lead to performance issues (because you may end up flooding the network with unimportant traffic and depriving workloads of sufficient bandwidth) or security challenges (due to lack of pod isolation at the network transport level).
Note also that Network Policies don’t allow management of TLS traffic encryption. To handle that, you’d use a service mesh or ingress controller.
Network Policies operate based on the following four concepts:
Network Policies work using the following steps:
Automated enforcement: Once applied, a Network Policy is automatically enforced by Kubernetes.
In the background, Network Policies rely on a Container Network Interface (CNI) plugin to manage network traffic. CNI plugins enable Kubernetes to provide networking to containers. There are a number of CNI plugins available, and all of them support basic Network Policy features like the ability to filter traffic based on IP address ranges. However, some advanced Network Policy features (like using the endPort field to specify a range of allowable networks for egress outgoing traffic) only work with certain CNI plugins.
You don’t need to specify a CNI plugin when configuring a Network Policy, but you do need a CNI plugin to be present for the policy to work (in fact, networking in Kubernetes won’t work at all unless you have a CNI plugin).
To contextualize Network Policies, let’s look at some common examples and use cases.
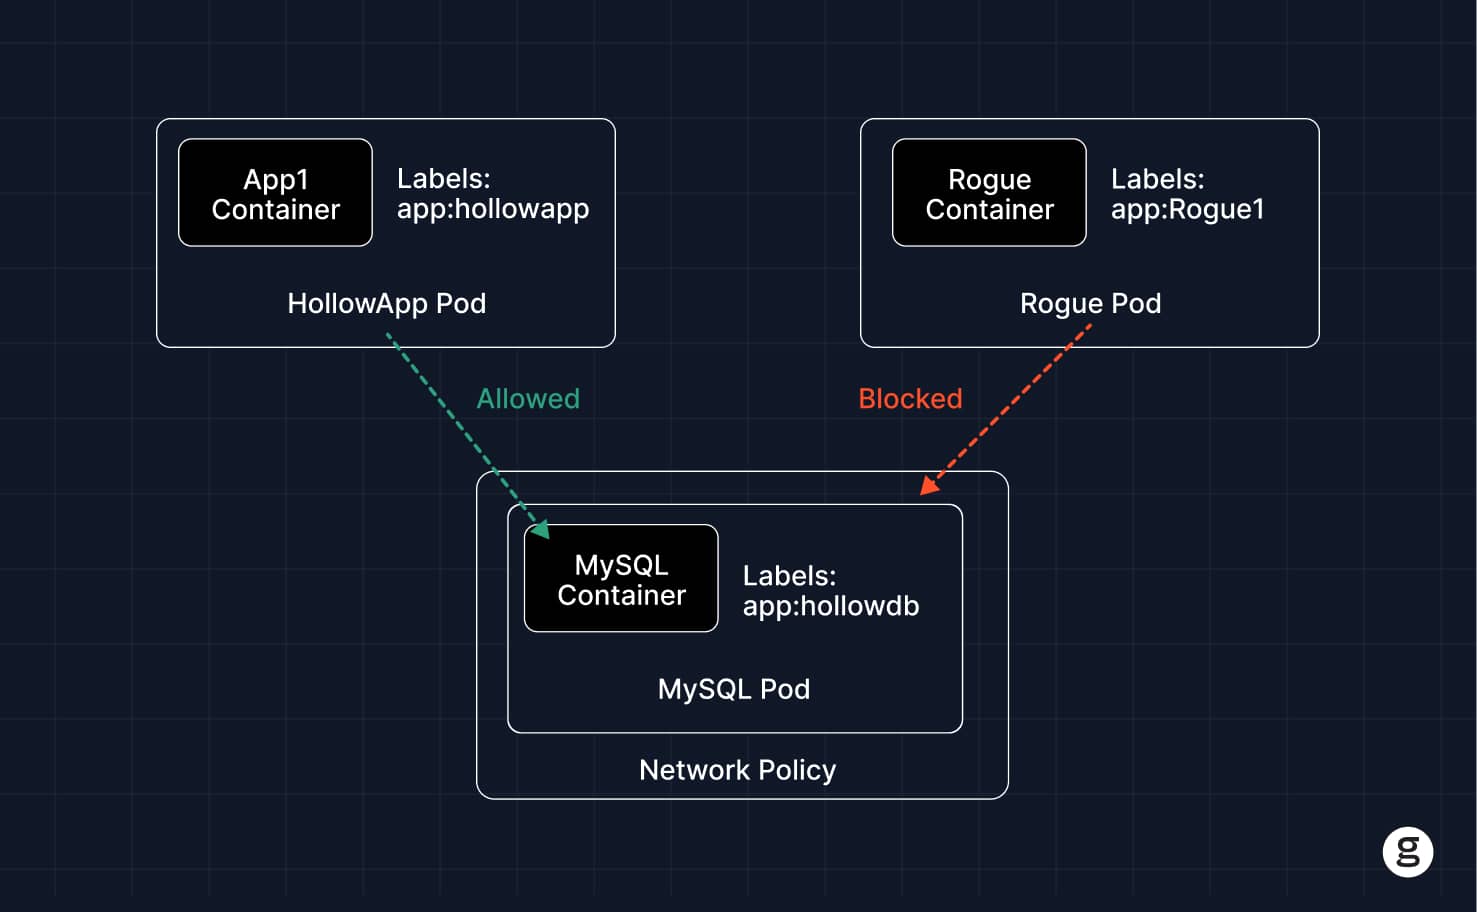
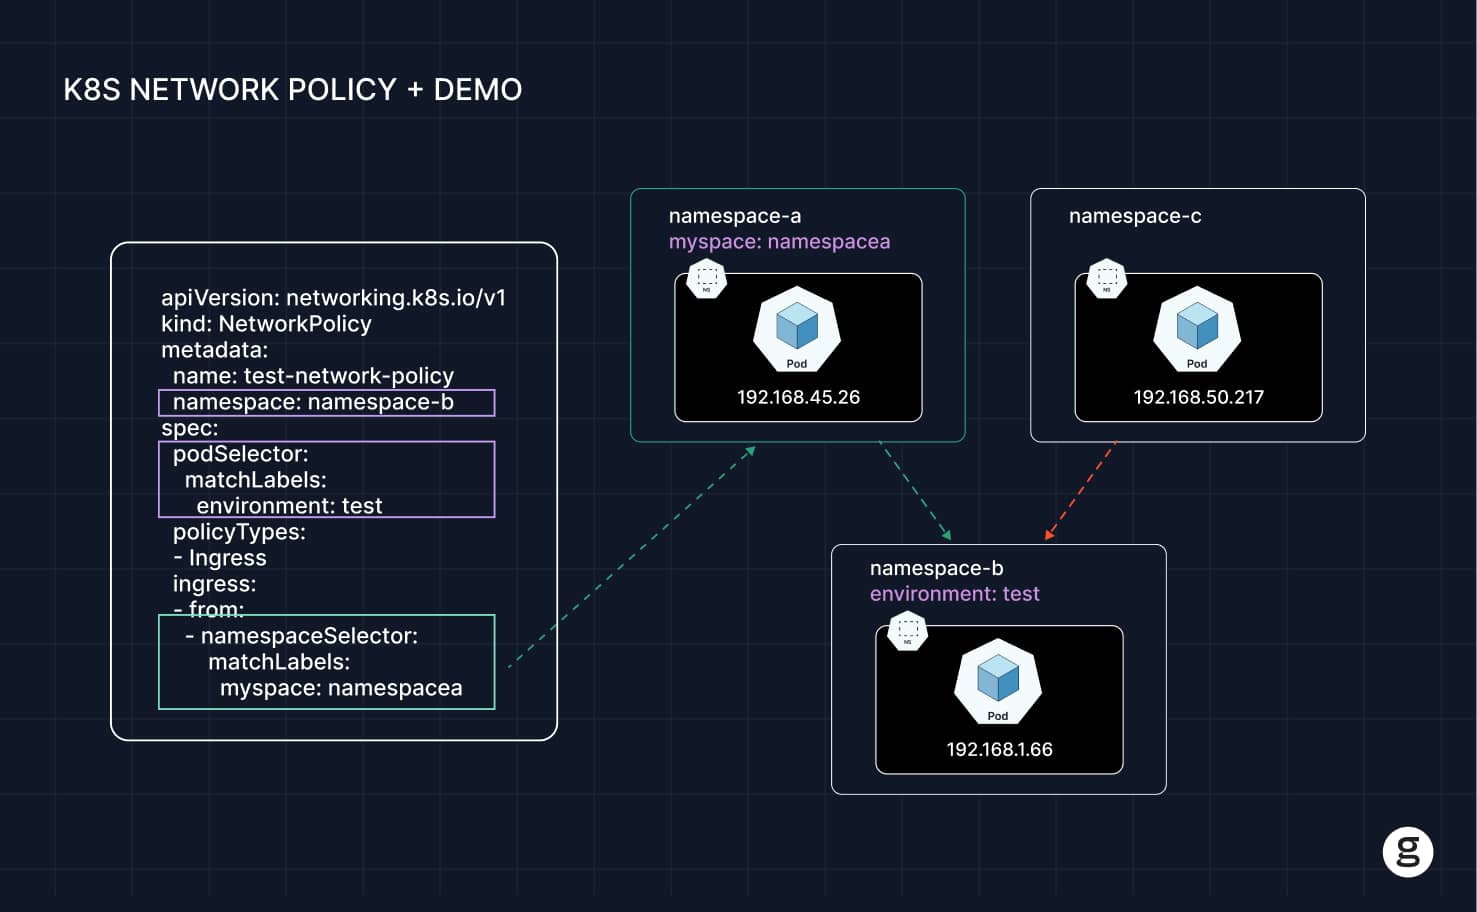
The following Network Policy allows the namespace default to receive traffic only from other pods that exist within the same namespace. This may be desirable as a way of segmenting pods within a namespace at the network level.
The ingress: field in this policy tells Kubernetes to allow incoming traffic from all pods in the namespace that match the selector {} – which means all pods because {} matches everything.
Imagine you want to block incoming traffic to a specific namespace. This could be useful if, for example, you are using the namespace for dev/test purposes and you want to isolate it from all incoming traffic.
You can achieve this using the following Network Policy:
Here, we specify dev as the namespace to match, and the selector {} matches all pods in that namespace. The policy denies all ingress traffic because it is not configured to allow any traffic – and if a Network Policy that doesn’t explicitly allow any traffic, Kubernetes denies all traffic by default.
Now, imagine you want to block outgoing network traffic from a given pod, except when the pod is communicating with specific external hosts. This could help reduce the risk of leaking sensitive data from the pod to an external endpoint.
You can achieve this using the following policy:
This configuration states that pods that are labeled my-app can only send egress traffic to endpoints whose IP addresses are in the 203.0.113.0/24 CIDR block.
To set up and apply a Network Policy, follow these steps.
First, write YAML code that defines what you want the policy to do. For example:
Save the code as a file, such as my-policy.yaml.
Using kubectl, apply the policy:
You should receive a response indicating that the policy was created.
At this point, your policy is automatically implemented and in effect. Assuming the policy works as you intended, you don’t need to do anything else.
If the policy doesn’t work and you need to fix it, or if you simply want to make a configuration change, you can update it by modifying the YAML code, then use the kubectl apply command to apply the updated policy.
For example, imagine that, when deploying the example policy above, you accidentally specified the wrong namespace because you chose default when you meant dev. You would simply change your YAML to look like the following:
Then, save the file as my-policy.yaml and run the following command again:
The benefits of Kubernetes Network Policies fall into two main groups – performance and security.
From a performance perspective, Network Policies offer the following benefits:
From the perspective of security, Network Policies provide these benefits:
Network policies are a powerful tool, but they can be difficult to implement. Common challenges include:
To mitigate the risk of Network Policy issues and make your policies as effective as possible, consider the following best practices.
Since pods not covered by a Network Policy have no protections at the network level, it’s a best practice to ensure that all pods throughout your cluster are covered by a default policy.
The easiest way to do this is to create a default policy with no namespace specified and with {} as the podSelector value. This will match all pods in all namespaces. You can include explicit deny policies in this policy to block all traffic by default, then create additional policies that grant access on an as-needed basis to specific namespaces or pods.
In general, managing networking rules based on namespaces rather than individual pods is simpler and better from a resource perspective because it leaves you with fewer policies to configure. Configure policies on a per-pod basis only when you require a level of granularity that you can’t achieve using namespace-level policies.
You can also reduce total policy count (and, by extension, complexity) by making each Network Policy support both ingress and egress. This eliminates the need to create separate incoming and outgoing traffic policies.
Where possible, avoid creating more than one policy that matches the same pod, since this could lead to conflicts. Having multiple policies for a given pod may be unavoidable in cases where the pod includes multiple labels that match different policies. But in general, this is unlikely to be necessary because it’s not common for the same workload to require different types of networking rules.
Since Network Policy behavior and features depend to some extent on the CNI enabled in your cluster, it’s important to know which CNI you are using.
The default CNIs that ship with Kubernetes vary by distribution, so check your distribution’s documentation if you’re unsure which CNI you are using. Alternatively, check the /etc/cni/net.d/ directory on a control plane node; this is usually where configuration files for your cluster’s CNI reside, so you can look at those files to tell which CNI (or CNIs) are in place.
If a policy is not working as expected, the following steps can help you determine the root cause of the issue:
When working with Network Policies, the following tools can help streamline the deployment and troubleshooting process:
We just mentioned eBPF, but we’ll mention it again, because it’s the secret sauce that makes groundcover so powerful in the realm of Kubernetes Network Policy management and troubleshooting. Under the hood, groundcover uses eBPF in Kubernetes to collect low-level data about Kubernetes network performance – which means you can quickly get to the root of networking issues.
If you want to know, for instance, which packets are flowing to and from which pods, and how those flows align with network policies, groundcover can tell you quickly – without requiring you to know details about which CNI network plugin you’re using or sort through CNI-specific log files.
Like most things in Kubernetes, Network Policies are powerful but complex. You’ll want to set up Network Policies for all but the most simple of clusters, yet you may also find that your policies don’t always work as you expect – which is why the ability to troubleshoot network behavior with help from tools like groundcover is critical for making the most of the Kubernetes Network Policy feature.
Keep up with all things cloud-native observability.
We care about data. Check out our privacy policy.
Monitor everything, deploy in minutes.
Cover your entire Kubernetes stack instantly
with no code changes.
Auto-detect issues across your entire cluster.
See it all. Store what matters. Pay Accordingly.

Meet the groundcover team for a 30 minute live session
Explore how groundcover provides instant, out of the box insights across logs, traces, metrics, and more.
Get a walkthrough of the platform, pricing model, and real world use cases tailored to modern observability challenges.
Ask anything- our team will address your specific stack, scale, and deployment needs.


By submitting this form you agree to our friendly privacy policy.

.svg)

.jpg)